
QuickBooks Packing Slip Creation and Printing
How to Create and Print a Packing Slip in QuickBooks
QuickBooks is not a huge packing slip fan! As a matter of fact, the only place you will find any reference to packing slips, is in the drop down list where you go to select templates for either sales order or an Invoice, and it is only available in the Premier and Enterprise versions.
So, if you are using either of these, the first thing you need to do is to turn on the Sales Order preference in QuickBooks if it was not already turned on. If it was turned on, you will see the Create Sales Order option under the Customers menu. If it is not there, go to: Edit at the top menu bar and select Preferences. Next, click on Sales & Customers, then Company Preferences at top center. Now, check the box to the left of Enable Sales Order and click Ok. (QuickBooks will then close all open windows in order to accept the changed preferences.)
Now, here is how you Create and Print a Packing Slip in QuickBooks Premier or Enterprise
Step 1. Go to Customers at top menu bar and click Create Sales Orders
Step 2. Click on the dropdown to the right of “Template” as shown in the screenshot below, and select Intuit S.O. Packing Slip
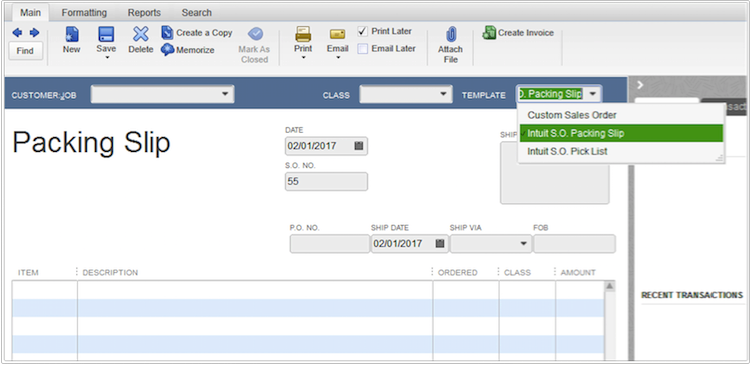
Step 3. Complete all fields and click Save & Close or Save & New to create new packing slip.
To Print Packing Slip in QuickBooks Premier and Enterprise
Step 1. Go to File at top menu bar, click on Print Forms and select Sales Orders
Step 2. Check the box(es) to the left of the packing slip(s) you want to print, and click Ok
To Edit Packing Slip in QuickBooks Premier and Enterprise
Step 1. Go to Customers at top menu bar and click Create Sales Orders
Step 2. Click on the dropdown to the right of “Template”, and select Intuit S.O. Packing Slip
Step 3. Click the blue arrow pointing left, at top left of Sales Order screen until you get to the sales order in question. See blue arrow in screenshot below.
.png)
Step 4. Make the edits, then click Save & Close.
NOTE: Unlike some software that has a special menu to create and print packing slips, QuickBooks simply views a packing slip as just another version (template) of either a Sales Order or an Invoice. What this means is that the Sales Order and the Packing Slip will be using the same template, and when you go to create the Invoice, only one will be used by the Invoice. (You can choose to use the Packing Slip if you are Invoicing for only what you are shipping).
Also, you will not be able to tell the difference as both the Packing Slip and Sales Order will be listed as Sales Order. As such, you will need to give the Packing Slip a unique number such as PS437 etc. (PS of course for Packing Slip) and SO437 etc. (SO for Sales Order). When you use the above letters to identify each, you will be able to see which is which when you mouse over Sales Order in the Create Invoices screen. You can edit the Packing Slip as needed to show only what is being packed.
Also, note that since only one or the other (Packing Slip or Sales Order) will be transferred to the Invoice, the one that is not used will remain as unused in the Create Invoices screen. However, this will not affect any reports.
- Check our FAQ's for Answers to the Most Frequently Asked Questions by Our QuickBooks Community
- If you still have questions that are not answered in our FAQ's, let us know in the comment section here so we can respond.
.png)