
Customers, Vendors & Employees Setup
- Setting Up Your Customers Accounts in QuickBooks
- Setting Up Your Vendors Accounts in QuickBooks
- Setting Up Your Employees Files in QuickBooks
Setting up Your Customers in QuickBooks: Pro,
Premier, Enterprise
- Setting Up Customer Accounts in QuickBooks for Mac
- Setting Up Customer Accounts in QuickBooks Online
Step 1. Go to the Customers menu, and select Customer Center.
Step 2. In the top left corner of new screen, click New Customer & Job, then from the drop-down, select New Customer.
Step 3. Enter your customer's name in the Company Name field, the date you are setting them up for in the as of date field, and how much they owe you as at the date you are setting this customer up for, in the Opening Balance field. (You do not need to enter any info. in the Customer Name field, whatever name you enter in the "Company Name" field will be automatically filled in, in the "Customer Name" field as well as the "Invoice/Bill To" field.
Now, for an example of the correct amount to enter as the opening balance:
Staples is your customer (they established an account with you), you sold them 100 printers on December 20, 2008 for $2,100 and they paid 50% (per your term of agreement) and agree to pay the balance within 30 days (on January 19, 2009). You did not have a QuickBooks system in place in 2008, so now, you are creating a system in QuickBooks as at January 1, 2009 (your fiscal year beginning date), you will enter January 1, 2009 in the date field above, and enter their 50% balance (that they still owe you as at January 1, 2009) of $1,050 in the Opening Balance field.
If your fiscal year starts in January and you decide to start using QuickBooks in May, I suggest you start your company in QuickBooks as at January 1 (your current year) and enter all transactions (individually) as at January 1, instead of bulking them in opening balances and general journal entries. This way you are better able to track everything for the year and generate useful, detailed reports. For customers, you will be able to send them meaningful statements of accounts, and copies of partially paid invoices.
Step 4. Enter all other relevant information on that screen, including the address details. Click in the Invoice/Bill To field, and fill in the Customer address below the Customer's name that is already there. If you will be shipping to a different address fro this customer, click the drop-down tab at Ship To, and then Add New. Complete the fields in the new window, and click Ok.
Step 5. Now that you have finished setting up your customer's address details, click on Payment Settings on left of New Customer window.
Step 6. Here you will complete all relevant fields to setup the way you interact with this customer re: payments. If an option is not in a drop-down tab, click Add New and enter the information you need, then click Ok to return to the New Customer screen. (Add Online Payment Link To Invoices is an option that will allow your customers to pay you via Intuit's "PaymentNetwork" and you get it delivered in your QuickBooks (additional fees apply). It is a very useful feature that allows for faster funding and convenience. To learn more about this feature, visit the "PaymentNetwork" page on Intuit's website. If you decide to use it, you can edit the customer accounts you will be using it for, and modify this option.
NOTE: Intuit's Payment Network has been discontinued as at June 30, 2016. See alternatives here.
Step 7. Click Sales Tax Settings. If you will not be collecting taxes from your customers, you can totally bypass this step. If you will be, and you did not answer yes during the initial setup interview, you will now have to turn on sales tax.
Step 8. Click on Additional Info and enter the type of customer in the Customer Type field, and the representative for this customer in the Rep field.
Step 9. If you currently have a job you are working on, or pending for this customer, you can enter that job information in the Job Info fields. If you have more than one job in progress for this customer, you can enter them later after you are through setting up the customer. See how to add a job to a customer.
Step 10. Click Ok. You should see the customer you just created in your list of customers.
RELATED: Customer Setup & Management
Setting up Your Vendors Accounts in QuickBooks: Pro, Premier, Enterprise
Step 1. Go to the Vendors menu, and select Vendor Center.
Step 2. In the top left corner of new screen, click New Vendor, then from the drop-down, select New Vendor.
Step 3. Enter your vendor's name in the Company Name field, the date you are setting them up for in the as of date field, and how much you owe them as at the date you are setting this vendor up for, in the Opening Balance field. (You do not need to enter any info. in the Vendor Name field, whatever name you enter in the "Company Name" field will be automatically filled in, in the "Vendor Name" field as well as the "Billed From" field.
Step 4. Enter all other relevant information on that screen, including the address details. Click in the Billed From field, and fill in the Vendor address below the Vendor's name that is already there.
Step 5. Now that you have finished setting up your vendor's address details, click on Payment Settings on left of New Vendor window.
Step 6. Here you will complete all relevant fields to setup the way your vendor interact with you re: payments. If an option is not in a drop-down tab, click Add New and enter the information you need, then click Ok to return to the New Vendor screen.
Step 7. Click Tax Settings. Enter your vendor's tax id number in the Vendor Tax ID field. (If you use unincorporated vendors, such as outside consultants or subcontractors, you need to send a 1099-MISC form to those who are paid more than a specific amount per year. Check the box Vendor eligible for 1099.)
Step 8. Click on Account Settings. (Accounts you select here will show up automatically in the accounts field when you enter a bill for this vendor. For example, bills from your electricity company will show up in your utilities account, that is, if you assign it to utilities. Spending a little time to setup your accounts accurately will save you a lot of time later.)
Step 9. Click on Additional Info and enter the type of vendor in the Vendor Type field.
Step 10. Click Ok. You should see the vendor you just created in your list of vendors.
Setting up Your Employees Files in QuickBooks: Pro, Premier, Enterprise
Step 1. Go to the Employees menu, and select Employee Center.
Step 2. In the top left corner of new screen, click New Employee. Click the Turn on Payroll link on page. It should take you to the screen as shown in the snapshot below:
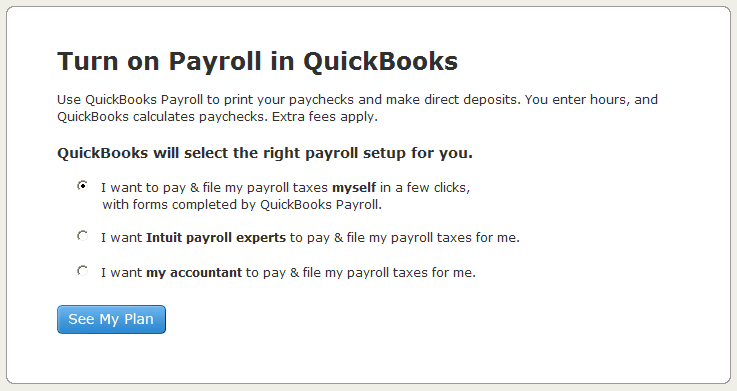
Make your selection, and click See My Plans. Next select the plan you require, and make your payment. When you are finished, close that window to get back to the previous window and complete your employee setup. You will be able to generate your payroll any time after turning on your payroll and creating your employees files.
Now, back to creating your employees files:
Step 3. In the New Employee window click on Personal, and enter your employee's name, social security, gender, and date of birth in the fields provided.
Step 4. Next, click on Address & Contact, and enter your employee's address and contact information.
Step 5. If you use special numbers to identity your employees, click on Additional Info and enter this employee's number in the provided field.
Step 6. Now click on Payroll Info, you will be setting up your payroll schedules, payroll item(s), taxes and tax withholding information. If you would like to setup payroll schedule(s), click the drop-down icon in the Payroll Schedule field, then click Add New. In the new window, answer the questions to let QuickBooks know how to calculate and schedule your payroll, then click Ok. (The Pay Frequency field is automatically filled in with the info you entered).
Step 7. Click on the drop-down icon in the "Earnings" Item Name field. In the new window, select the way in which you would like QuickBooks to track your payroll item (hourly, yearly, by commission, or bonus.) and click Next. The next screen you see will depend on the choice you just made, enter all information. You can add as many items to reflect the various items (regular pay, commission, bonus, etc) for each employee. Click Finish when you are done.
Step 8. If you have for example, pension plan, 401K, etc. to enter, click on the drop-down icon in the "Additions, Decuctions, and Company Contributions" Item Name field and enter them.
Step 9. Click on Sick/Vacation, complete the fields and click Ok.
Step 10. Click on Employment Info and enter your employee hire date, and type.
Step 11. Click Ok. You should see the employee you just created in your list of employees. You can always go back and edit your employees information.
RELATED: Employee Setup & Management

.png)