
About QuickBooks Online (Prior to 2014)
If you are a business on the go with multiple people requiring access to QuickBooks, then QuickBooks Online is for you. Otherwise, you can bypass it and use one of the windows based platform: QuickBooks Pro, QuickBooks Premier, QuickBooks Enterprise, or if you are a Mac only user, QuickBooks for Mac.
QuickBooks Online is defined as being in the cloud, which means it is not hosted by you and can therefore be accessed from any computer with an internet connection.
 The cost to operate QuickBooks Online ranges from under $20 up to $75 per month as of 2013. Beside the basic one (1) user QuickBooks Online Simple Start, you can subscribe to the three (3) users QuickBooks Online Plus, or the five (5) users QuickBooks Essentials and add more users as you require.
Also, in order to use certain features such as payroll, you will need to purchase QuickBooks Online Payroll which is also in the cloud. Like QuickBooks for Mac, you will not be able to generate payroll taxes through your QuickBooks, you will also need to ensure that your employees information are entered accurately.
The Pros and Cons of QuickBooks Online
The Pros:
1) QuickBooks Online can be accessed from anywhere in the world that has an internet connection. You do not have to be confined to your only computer(s) that host QuickBooks.
2) You do not have to use your hard drive space to host QuickBooks.
3) QuickBooks Online can be accessed via an iPad. (It does not have all the functionality of a the regular QuickBooks Online but it is enough to keep you updated with your QuickBooks data on-the-go, and can also help you get your invoices and estimates out to your customers - so you do not lose business).
4) Unlike the Windows versions, you can process your payroll from any computer with an internet connection, as with QuickBooks Payroll for Mac. This is a huge plus for people constantly on the go.
The Cons:
1) There is a monthly subscription associated with QuickBooks Online.
2) You do not have full control of your data as you do not own it. Once you stop paying your subscription, your entire company data will be at risk of being lost.
3) Because it is server and internet based, it can be very slow using QuickBooks, even with the best internet service.
4) Unlike Windows-based QuickBooks (Pro, Premier, Enterprise) where you can use multiple windows and be flexible, QuickBooks Online is available only one window at a time.
5) QuickBooks Online does not allow for Integrated Payroll - you will need to purchase QuickBooks Online Payroll - separately, which is also "in the cloud". Because it is not stored on your computer, you will not be able to generate your payroll taxes through QuickBooks, as in the Windows versions. You will also need to ensure that simple things, such as your employees names are spelled the same way in QuickBooks Online as well as QuickBooks Payroll Online during setup, in order to get your Payroll service to work accurately.
6) You are not able to adjust form elements or customize forms to suit your business's needs.
7) QuickBooks Online is missing out on key tracking abilities; you cannot easily track jobs. (It is difficult to add - not able to make inactive - they have to be created as a "sub-client", there's no classing available, and it is tedious to create a PDF of an invoice).
8) Because QuickBooks Online does not allow multiple windows to be opened at the same time, you will waste a lot of time going back and forth from one window to another, accessing data that you need to complete what you are doing in the current window.
9) You cannot invoice multiple customers at once with Batch Invoicing.
10) You are not able to edit timesheets as in the desktop versions, you will need to delete and recreate to correct any errors.
11) QuickBooks Online does not support multiple currency.
12) QuickBooks Online does not support Progress Invoicing.
QuickBooks Online Company Setup and Management
- QuickBooks Online Signup
- Company Preferences Setup
- Information That Can Be Imported Into QuickBooks Online
- Setting up the Chart of Accounts in QuickBooks Online
- Setting Up a Customer in QuickBooks Online
- Creating an Invoice in QuickBooks Online
- Receiving a Payment in QuickBooks Online
- Reconciling a Bank or Credit card Account in QuickBooks Online
- Setting Up & Managing Timesheets in QuickBooks Online
- Invoicing Customers from Timesheets in QuickBooks Online
- Paying Vendors and Contractors from Timesheet in QuickBooks Online
- Progress Invoicing in QuickBooks Online
QuickBooks Online Signup
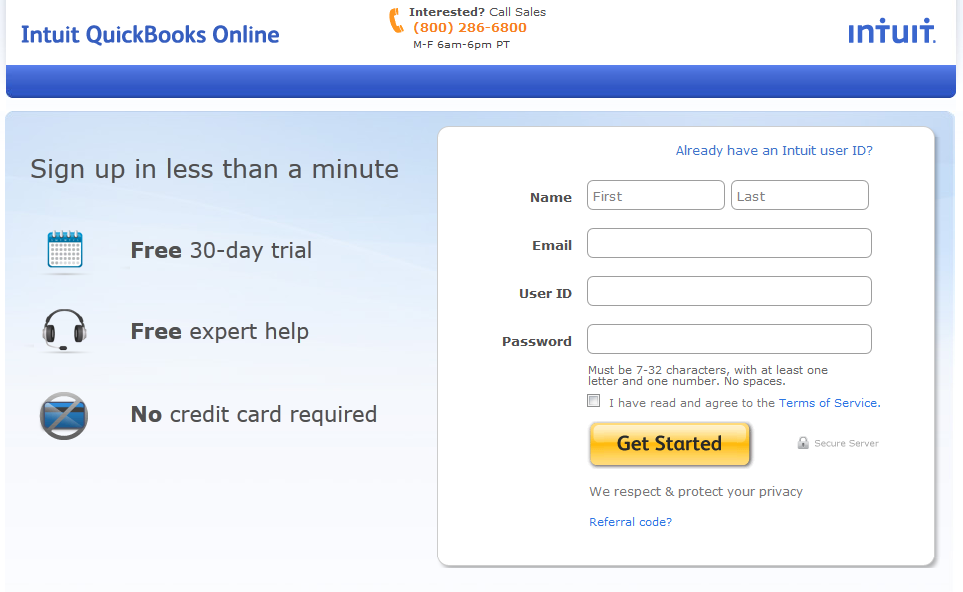
Signing up for QuickBooks Online is pretty easy; as seen in the screen shot below, there is no credit card necessary and you have a full 30 days to try it for free before the paying subscription fee kicks in. Enter your info and you will be ready to start using it within seconds.
This next screenshot, shown below, is called the Dashboard. It is the main QuickBooks Online window and the first window you will see after you complete your signup as shown above.
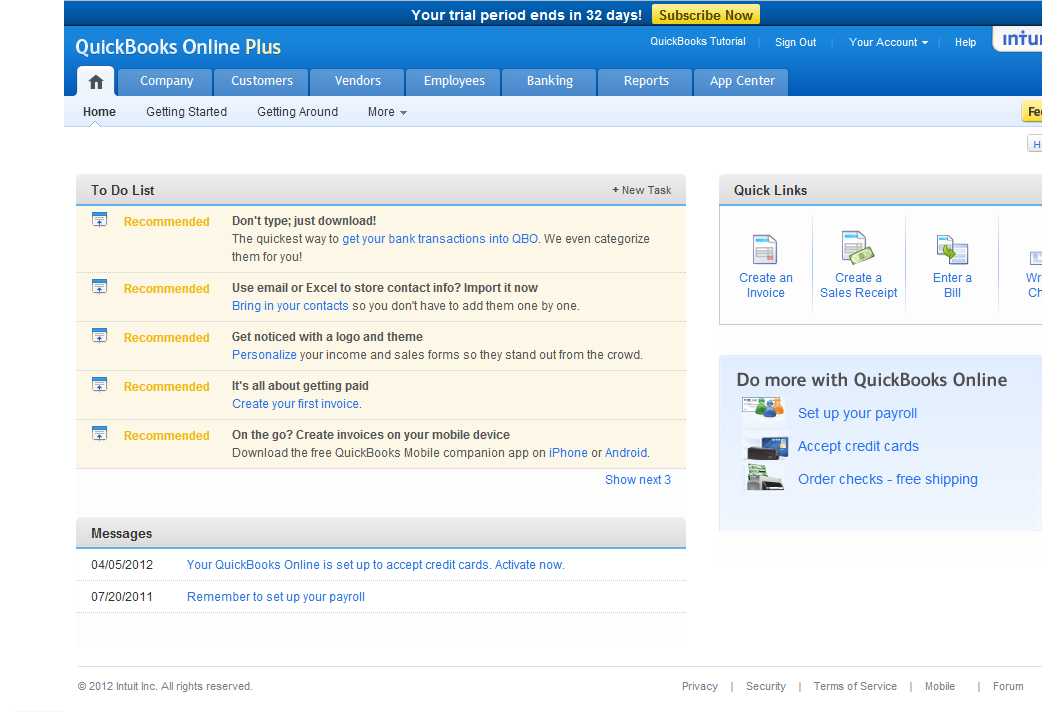
Now you need to Setup your company preferences. To do so, go to the Company menu and click Preferences.
Company Preferences Setup
I love the QuickBooks Online Preference Screen! It has tons of configurable options, and you can keep scrolling, and scrolling to options that can help make the QuickBooks Online experience easier. I can see people getting overwhelmed with all these options, but you do not have to use them all if you do not want to.
Unlike older versions of QuickBooks Desktop that usually forces you to configure all these options before you can initially start using QuickBooks, QuickBooks Online does not make you go through this screen at the start if you do not want to. However, the company preference houses a lot of important features, and if you are serious about setting up your books right, then I highly recommend you at least go through the list of options and complete the ones you believe will help make your QuickBooks experience and your business's books better.
Preference Features:
1) Company Contact Info - This is the company contact information that your customers will see, so be sure to include all pertinent information - accurately. It is also the information that will be used to auto-fill-in your forms such as your Invoices, payroll tax forms etc.
2) Company - In this option you will input your Employer Identification Number (EIN) or the number you use to file your taxes, your fiscal and tax year, the type of tax form you use for your business structure (sole proprietor 1040, corporation 1120(S) etc), closing the books, account numbers, quickfill autosuggest, customer terminology, email alerts, auto-recall (recalls past transactions and auto-fills for you), setup interview, length of time to stay logged in after a period of inactivity.
3) Categories - This feature allows you to setup the way you will track your income and expenses. Location tracking (tracking your income and expenses by location), class tracking (tracking your income and expenses in different ways, such as services income vs products income)
4) Products and Services - Here you will be able to associate products and services with specific accounts, as well as give them more detail such as: description, quantity, and price. There is also the option of tracking the quantity of your products - inventory, which when is setup correctly can help you with re-ordering decision. In other QuickBooks versions these are simply called "items".
5) Sales Form Entry - The Custom fields allow you to create custom fields on customer invoices, estimates, sales receipts, refund receipts, and credit memos. Some of the options are: custom numbers, delayed charges, deposits, discounts, estimates, message to customers, sales tax, service dates, shipping, terms, and apply credits.
6) Form Delivery - This option allows you to customize your forms, delivery method, email message, email attachments, html emails, and statements.
7) Invoice Automation - This option allows you to automatically create invoices for customers with unbilled activities.
8) Accept Credit Cards - This option allows you to turn on QuickBooks Merchant Service at an additional cost or link to to your current merchant service provider.
9) Accept Online Payments - This is the option to turn on QuickBooks Payment Network feature which is available at an additional cost.
10) Vendors & Purchases - These options allow you to manage your bills, expense by customer, split lines, duplicate checks, duplicate bills, setup terms, apply bill payments, and purchase orders.
11) Time Tracking - This option allows you to track time and charge customers.
12) Payroll - This is where you setup your payroll preferences.
13) Reports - This is where you setup the way you will be viewing your reports: cash or accrual, display or print settings, and a few more options.
Information That Can Be Imported from Other QuickBooks Versions into QuickBooks Online
In a nutshell, you can import:
- Chart of Accounts via Excel
- Products and Services via Excel
- QuickBooks Desktop Company Data
- Transactions from your Bank via QBO, OFX, and QFX files
- Customers and Vendors Data from Outlook, Excel, or Gmail
Setting Up the Chart of Accounts in QuickBooks Online
QuickBooks already has a preset Chart of Accounts in place, but you can customize it to suit your unique business needs. You can delete the accounts you do not need, add the ones you do need and also edit them as necessary. You can also import your Chart of Accounts from an Excel or CSV file, if you already have one, by selecting the Import option.
To create a new account:
Step 1. Go to the Company menu and select Chart of Accounts
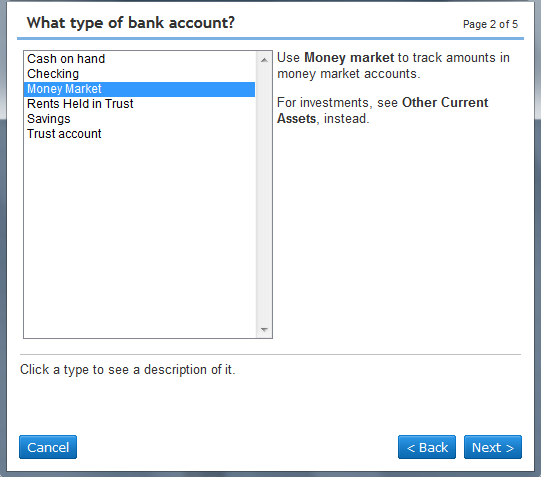
Step 2. Scroll to bottom of page and select the option that you require. For example, to create a new account select New, then choose the type of account you are setting up, in the new window as shown in snapshot below.
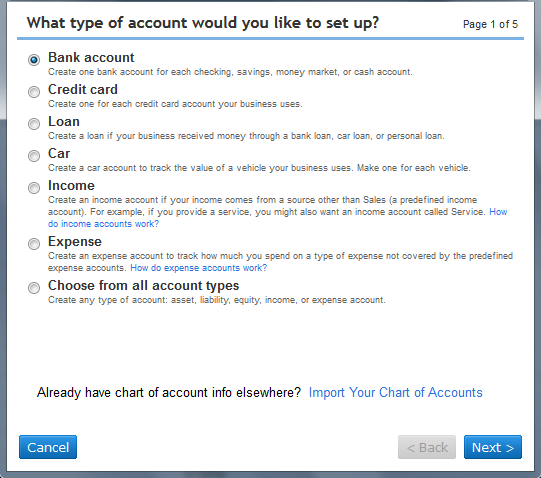
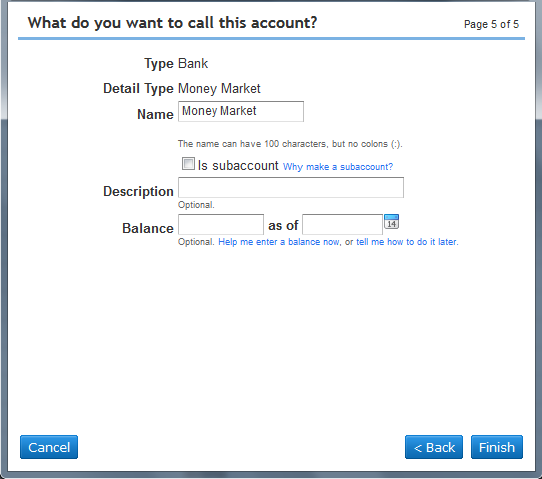
Step 3. Next enter the info. you need to in the other windows as shown in the snapshots below. ( I have created a Money Market Account, thus the screens below. Make your selection and fill in the information that relate to the option you have chosen in the other screens.)
Step 4. Here you have the option of editing the account name. Enter the opening balance for the new account (if you have an opening balance), and input the date you started that account.
Setting Up a Customer in QuickBooks Online
Step 1. Go to the Customer menu and select New Customer in top left of screen.
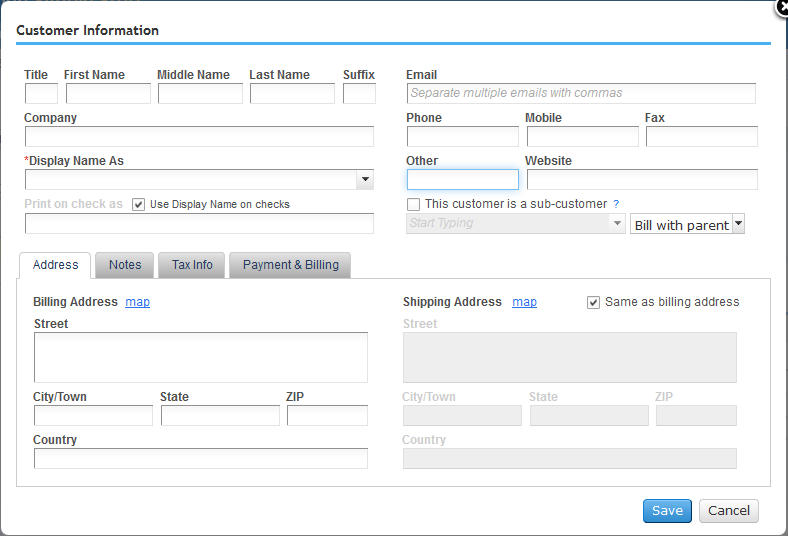
Step 2. Next, complete the fields in the new window (as shown in snapshot below) with as much of the customers' information as you like. (Bear in mind that the information you input will be auto fill on the invoices you create for this customer.) After filling in the address field, click on Payment & Billing and enter this customer's opening balance - if there is one (you may not have an opening balance if this is a new customer, but if you had this customer before now and you are just starting your company in QuickBooks, you may have one). Enter the date that corresponds with the opening balance you entered.
Adding a Job to a Customer in QuickBooks Online
In QuickBooks Online, a new customer job is referred to as a sub-customer. If this is another job for a customer you already have, check the box to the left of This customer is a sub-customer then select the "parent" customer and choose whether you want to bill that customer for this job, or bill separately. Check to ensure you have entered all the information accurately in all the relevant fields.
Step 3. Click Save
Creating an Invoice in QuickBooks Online
Step 1. Go to the Customer menu and select Invoice as shown in the snapshot below.
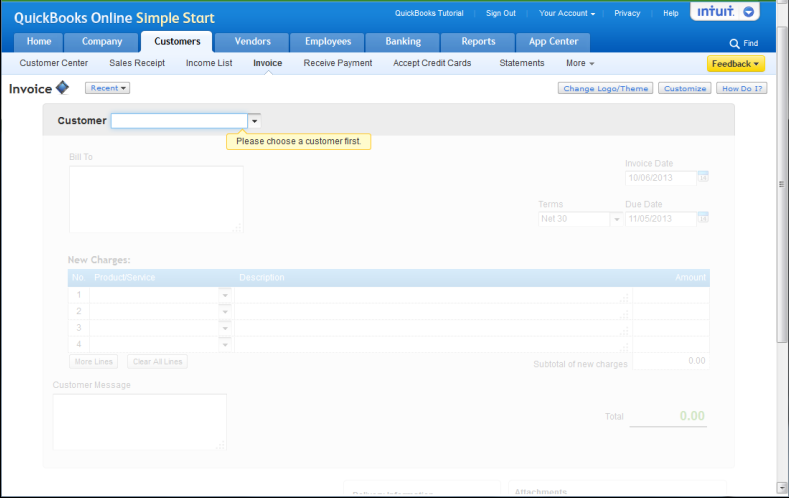
Step 2. Next, click the drop-down tab at Customer and select the customer for the invoice you are creating. If the customer is not listed, click Add New, then Add All Info and complete the fields as necessary, then click Save. The customer will be inserted automatically in your invoice, and you can continue creating your invoice as shown in the snapshot below. You can add a customer message such as, "Thank you for doing business with us" or "All work is complete, please remit payment". You also have the option of sending an attachment.
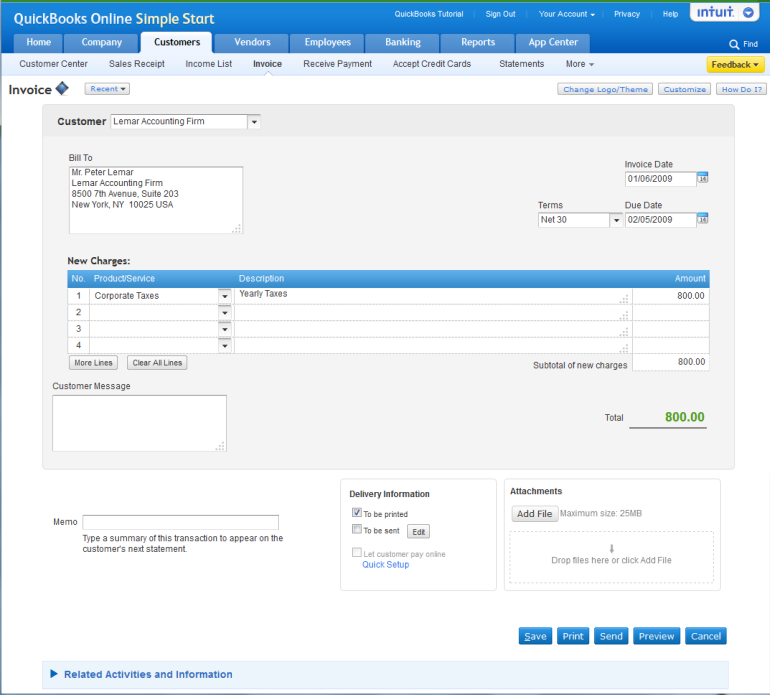
Step 3. Click Save. (You can go back to the invoice to preview the layout, send, print, void or delete it. To go back to the Invoice, go to the Customer Center at Customer, click on the customer you have created the invoice for (you will see a list of the invoices for that customer displayed at "transactions".) Select the invoice you need to view or make changes to.
Receiving a Payment for An Invoice in QuickBooks Online
Step 1. Go to the Customer menu and select Receive Payment as shown in the snapshot below.

Step 2. Next, select the customer for the payment you are receiving. (You will see a list of the invoices that are not yet paid, as shown in the snapshot below.) Check the box(es) next to the Invoice(s) you are applying the payment to, and enter the amount at "Payment" if the amount being paid is not for the entire amount due for that invoice. Enter all the information, and choose the account you want to deposit the money to.
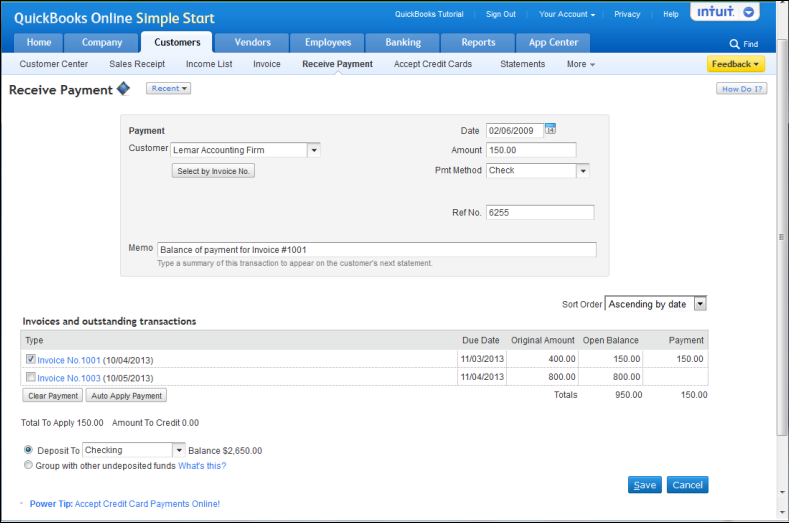
Step 3. Click Save.
Reconciling a Bank or Credit Card Account in QuickBooks Online
Step 1. Go to the Banking menu and click More, then select Reconcile.
Step 2. Next, select the account you want to reconcile from the drop-down menu at Account, and click Reconcile Now. You will be taken to a window as shown in the snapshot below.
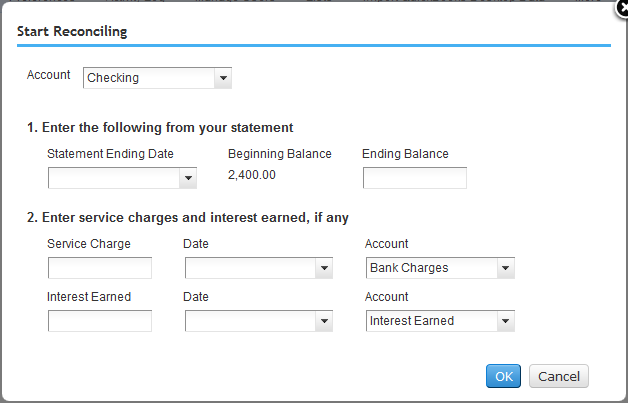
Step 3. Now, enter the ending date and ending balance as shown on the bank or credit card statement you are reconciling. (The "Beginning Balance" should match the beginning balance on your bank or credit card statement.) Enter the bank charges and interest earned in the fields provided. If you have more than one bank charges to enter, you can enter them in the register, and then return here to complete your reconciliation.
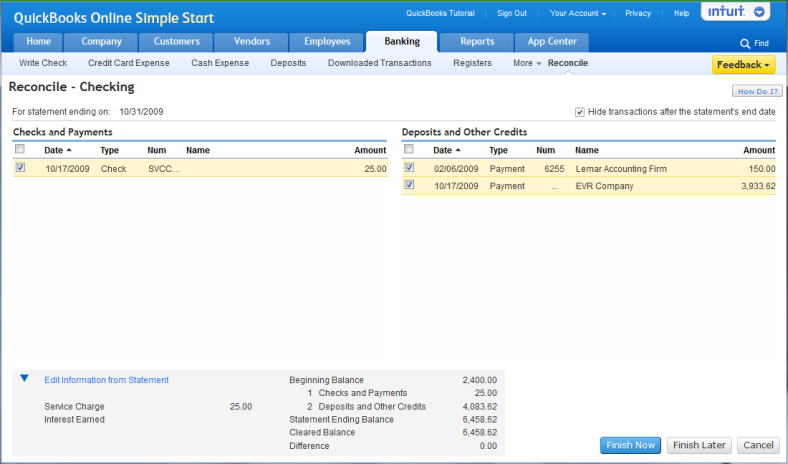
Step 4. Check the box(es) next to the transaction(s) that are both on your bank or credit card statement as well as in QuickBooks reconcile window for "Checks and Payments" on the left, and "Deposits and Other Credits" on the right, as shown in the snapshot below. When you are finished checking off your transactions, the Difference window at bottom should be 0.00. If it is not, you may want to look over to see that you have not checked a transaction you should not have, or you are missing a transaction that is on the statement but not in your QuickBooks. If this is the case, you can go to the register and enter the missing transaction(s). (NOTE: The difference must be zero (0), or your account is not reconciled. You can always finish reconciling it at a later date, by clicking the Finish Later button at bottom right.)

.png)