Refunding a Customer in QuickBooks
How to Refund a Customer in QuickBooks
How to Issue Customer Refund in QuickBooks
Windows (Pro, Premier, Enterprise)
Step 1. Go to Customers at top menu bar, and select Create Credit Memos/Refunds
Step 2. Select the customer from the dropdown, and complete all pertinent fields. Select the Item you are refunding the customer for, and the quantity.
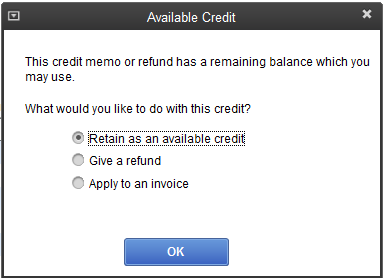
Step 3. Click Save & Close or Save & New. (A new window will open displaying the messages as shown in screenshot below)

Step 4. Choose Apply to an Invoice, then check the box to the left of the Invoice you are refunding for.
Step 5. Click Done.
NOTE: You can always go back and apply a credit/refund to an Invoice at any time, by opening up the Invoice, and selecting Apply Credits
If a customer overpaid you and need you to keep the credit on file, apply the entire payment to the Invoice, and choose Leave the balance as a credit when asked. If the customer request the refund to be paid over, choose Give a refund, select the account from which to refund the funds, and click Ok.
How to Issue Customer Refund in QuickBooks
Mac
Step 1. Go to Customers at top menu bar, and select Create Credit Memos/Refunds
Step 2. Select the customer from the dropdown, and complete all pertinent fields. Select the Item you are refunding the customer for, and the quantity.
Step 3. Click Save at bottom right.
If the customer need their money back, instead of leaving it to apply to future Invoices, follow step 1 above then select Refund from the menu bar.
Step 4. In check window, select the bank account you are using for the refund, enter the amount and click Save at bottom right.
NOTE: You can always go back and apply a credit/refund to an Invoice at any time, by opening up the Invoice, and selecting Apply Credits
If a customer overpaid you and need you to keep the credit on file, apply the entire payment to the Invoice, and choose Leave the balance as a credit when asked. If the customer request the refund to be paid over, choose Give a refund, select the account from which to refund the funds, and click Ok.
Step 6. Now print and mail the check.
How to Issue Customer Refund in QuickBooks Online
Step 1. Go to the plus + sign at top center of screen, and select Refund Receipt under Customers.
Step 2. Select the customer from the drop down at top left, input correct date, complete all relevant fields, and select the account you are using to refund your customer.
Step 3. Select the Item you are refunding the customer for, and the quantity etc.
Step 4. Click Save and new or Save and send at the bottom right of screen to email to customer.
Customer Setup & Management
- How to Set Up Your Customers in QuickBooks for Windows (Pro, Premier)
- How to Set Up Your Customers in QuickBooks for Mac
- How to Set Up Customers in QuickBooks Online
- How to Create an Invoice in QuickBooks
- How to Create an Estimate in QuickBooks
- How to Turn On the Estimates Preference in QuickBooks
- How to Progress Invoice in QuickBooks
- How to Turn On the Progress Invoicing Preference in QuickBooks
- How to Invoice Customers from Timesheets in QuickBooks Online
- How to Book a Bounced Check Against an Invoice in QuickBooks
- How to Create Items in QuickBooks for Mac for the Products and Services You Provide
- How to Record, Delete, or Edit a Sales Tax Payment in QuickBooks Online
- How to Record a Payment for an Invoice that Was Written Off in a Previous Year in QuickBooks


.png)
