
Frequently Asked Questions
Company Setup and Management Related Questions:
- How do I setup my company in QuickBooks?
- How do I setup users to work in QuickBooks and allow them limited access?
- How do I setup an administrator to access QuickBooks with a password?
- How do I change users and passwords in QuickBooks?
- How do I close an accounting period in QuickBooks?
- How do I set a closing date and password for the accounting period I am closing?
- What are the pros and cons of closing my books?
- How do I merge two companies in QuickBooks?
- How do I import specific data from one company to another in Quickbooks?
- How do I export specific data from one company to another in Quickbooks?
- How do I navigate to each company in Quickbooks?
- What is a sub account?
- How do I create a sub account?
- How do I start or setup a new company in QuickBooks?
- How do I delete a company in QuickBooks?
- How do I add items for the services I provide in QuickBooks?
- How do I delete an item or make it inactive?
- How do I set the preference for applications I want to integrate with QuickBooks?
- How do I set up and manage timesheets in QuickBooks Online?
- How do I Invoice Customers from Timesheets in QuickBooks Online?
- How do I Pay Vendors and Contractors from Timesheets in QuickBooks Online?
- How do I Record, Edit, or Delete a Sales Tax Payment in QuickBooks Online?
- How do I Import Files to QuickBooks Using Third Party Applications?
- How do I Record Personal Credit Card Expenses Incurred on Behalf of My Business in QuickBooks?
- How do I enter startup expenses paid for with my personal money in QuickBooks?
Items and Inventory Related Questions:
- How do I add items for the services I provide in QuickBooks?
- How do I add items for the services I provide in QuickBooks for Mac?
- What is a sub item?
- How do I create a sub item?
- How do I delete an item or make it inactive?
- How do I turn on inventory tracking in QuickBooks?
- How do I setup inventory accounts in QuickBooks?
- How do I create inventory part items in QuickBooks?
Customer, Invoicing and Accounts Receivable Related Questions:
- How do I create an Invoice in QuickBooks?
- How do I create an Estimate in QuickBooks?
- How do I turn on the Estimates Preference in QuickBooks?
- How do I progress invoice in QuickBooks?
- How do I turn on the progress invoicing preference in QuickBooks?
- How do I book a bounced check against an Invoice in QuickBooks?
- How do I create Items in QuickBooks for Mac for the products and services I provide?
- How do I record, delete, or edit a sales tax payment in QuickBooks Online?
- How do I record a payment for an Invoice that was written off in a previous year in QuickBooks?
- How do I Invoice Customers from Timesheets in QuickBooks?
- How do I Turn on the Estimate Preference in QuickBooks?
- How do I Turn on Progress Invoicing Preference in QuickBooks?
- How do I Create and Print a Packing Slip in QuickBooks?
Employee and Payroll Related Questions:
- What is a payroll schedule?
- How do I assign an employee to a payroll schedule?
- How do I Set up & Manage Timesheets in QuickBooks Online?
- How do I Set up My Employees in QuickBooks Online?
- How do I Prepare My Employees Paychecks in QuickBooks Online?
- How do I Setup Employees & Generate Payroll in QuickBooks Mac?
- How do I reimburse my employees via direct deposit while at the same time allocate reimbursement to a customer?
Banking Setup, Reconciliation and Related Questions:
- How do I setup my bank account in QuickBooks?
- How do I setup online banking in QuickBooks using direct connect?
- How do I print a list of unreconciled transactions in QuickBooks?
- How do I correct my opening bank balance in QuickBooks?
- When should I use the "Pay Bill" vs the "Write Check" feature in QuickBooks?
- How do I reconcile my monthly bank statement with my bank balance in QuickBooks?
- How do I clear transactions from the make deposit window in QuickBooks for a past period that was already reconciled?
- How do I download my Paypal Transactions to QuickBooks?
- How do I correct the opening bank or credit card balance in QuickBooks in order to accurately reconcile?
- Why are some deposits still in undeposited funds account in QuickBooks and how do I fix it?
- Why do I need to use the undeposited funds feature in QuickBooks and how do I use it correctly?
- How do I merge two bank accounts in QuickBooks?
- How do I remove checks from the print checks list in QuickBooks Online?
- Why is my bank balance not matching the bank balance in QuickBooks Online?
Vendor Setup and Management Related Questions:
- How do I setup vendors for 1099 in QuickBooks?
- How do I generate and print 1099s in QuickBooks?
- Why Are all My 1099 Vendors Not Showing Up on My 1099 Summary Report?
- How do I enter vendor bills in QuickBooks?
- How do I pay vendor bills in QuickBooks?
- How do I clear out vendor balances for bills that were mistakenly paid via the “Write Check” feature instead of the “Pay Bills” feature in QuickBooks?
- How do I enter bills paid by debit card in QuickBooks?
Tax Form Generating and Related Questions:
- How Do I Generate Form NYS-45 in QuickBooks?
- How Do I Generate Form 941 in QuickBooks?
- How Do I Generate Form 940 in QuickBooks?
Reports Generating and Related Questions:
- How Do I Generate a Profit & Loss Report in QuickBooks?
- How Do I Generate a Balance Sheet Report in QuickBooks?
- How Do I Generate a Cash Flow Analysis Report in QuickBooks?
- How Do I Generate a Trial Balance Report in QuickBooks?
- How Do I Generate a Generate Ledger Report in QuickBooks?
- How Do I Generate a Previous Year Comparison Report in QuickBooks?
- Why is My QuickBooks Profit & Loss Report Not Showing Owner's Draw?
- How do I delete a memorized report in QuickBooks?
QuickBooks Point of Sale Related Questions:
- How do I prepare my QuickBooks Company File to work with QuickBooks Point of Sale?
- How do I import QuickBooks data into QuickBooks Point of Sale?
- How do I initiate financial exchange between my QuickBooks company file and QuickBooks Point of Sale?
- What data is shared between my QuickBooks company file and QuickBooks Point of Sale?
Other General QuickBooks Related Questions:
What is a Fiscal Year?
A fiscal year (also known as a financial year) is a 12-month period used for calculating your company's yearly financial reports. Some states require financial reports once every 12 months, and do not require that the twelve months constitute a calendar year (i.e., January to December).
Many businesses use January as the first month of their fiscal year to coincide with their income tax year, which makes it easier to prepare their company's income tax statement. Your accountant can advise you if you decide to use a month other than January.
Where should I save my company files?
If you are not sharing your QuickBooks company file with other users, I recommend you save your company file on the same computer as QuickBooks. You can use the default location—the QuickBooks Company Files folder—or you can select a different location. If you choose to save your company file in a different location you should save it in its own folder. As you use QuickBooks, you will create other files that will be saved to the same location as the company file.
If you use QuickBooks Pro or Premier in multi-user mode, where you save your company file can affect performance.
What is a Peer-to-Peer Network?
Peer-to-peer networks are networks that do not use a dedicated file server. This means that all computers on the network can share their resources, including files. An example of a peer-to-peer network would be two or more connected computers running Microsoft® Windows® 2000.
If you have a peer-to-peer network, your company file can be on any connected computer on which you installed QuickBooks Pro or Premier. Put the file on the fastest, most powerful computer that has QuickBooks installed. This helps when users have other applications open while working in QuickBooks. It also helps when you are running or printing large reports, reconciling accounts, or paying tax-related liabilities. When you do any of these tasks, you get the best performance if you do them from the computer that has the company file.
On a peer-to-peer network, the computer with your company file must always be on and accessible to other users.
What is a Client-Server Network?
Client-server networks are networks in which at least one computer is dedicated to sharing files, printers, or other resources. This computer is usually not used by individuals to do their daily work. Examples of client-server network operating systems are Novell Netware® and Microsoft® Windows NT® Server.
If you have a client-server network, your company file typically resides on the network file server. This is the recommended method for sharing a QuickBooks company file. When you need to run or print large reports, reconcile accounts, or pay tax-related liabilities, use the fastest, most powerful computer connected to the server.
How Do I Setup or Make Changes to the Chart of Accounts?
- How to Setup & Customize the Chart of Accounts in QuickBooks Online
- How to Setup & Customize the Chart of Accounts in QuickBooks for Mac
You can customize your Chart of Accounts by adding accounts you need and deleting the ones you do not need. You can also edit your accounts to make changes, correct spelling or make account a Sub-Account of another.
Step 1. Go to the Company menu, click Chart of Accounts.
Step 2. Click Account, then New.
Step 3. Click on the type of account you are creating - Expense, Income, etc . (You will see a pop up box for each one you click on to show you examples of what account each is for.)
Step 4. Click Continue.
Step 5. In the newly opened "Add New Account" screen, enter the account name, and description (optional). You can use QuickBooks without assigning tax line mapping. In fact, I recommend that you do not use tax line mapping if you are not an accountant or tax professional.
Step 6. Click Save and Close.
To Edit or Delete Accounts follow Step 1 above, then:
Step 2. Click Account, then Edit Account, make the changes and click Save and Close. To delete an account, click Delete Account, then answer Ok to the question "Are you sure you want to delete this account?"
How Do I Change the QuickBooks Administrator?
Step 1. Log in to QuickBooks as the QuickBooks administrator.
- If you are not logged in as the administrator, reopen the company file and enter the administrator's user name and password.
- If you forgot the administrator's name, enter ADMIN in the User Name field.
Step 2. Go to the Company menu, click Set up Users and Passwords, and then click Set up Users.
Step 3. If prompted, enter your password again.
Step 4. In the "User List" window, select the administrator's name. Click Edit User.
Step 5. Enter the new administrator's name.
Step 6. Change the password.
Step 7. Enter a challenge question and answer.
Step 8. Click Next and then click Finish.
How Do I Focus My Idea?
You probably already have a general idea of what products or services you want to offer. However, before going into business, you need to focus your idea. If you want to open a restaurant for example, you need to think about what it is that will attract customers to your restaurant. Perhaps you have noticed that a certain neighborhood has started to attract more and more French people and you believe you could compete in a market there as there aren't any French restaurants there. Or perhaps you have decided that what your area needs is a restaurant specializing in exotic juices. There are many different ways you could focus your idea, just be sure you believe in the angle you choose.
How Do I research My Idea?
The old adage that "knowledge is power" is true. The more information you have about your business idea in particular and about business in general, the better off your start-up will be. Research every aspect of going into business and get to know your market intimately. As you research your idea, collect all your information in one place and organize it. This is the information you will use to craft your business plan. As you research your idea, here are some key questions you should be asking:
- How large is the market for your product or service?
- What is the general profile of your customer?
- Who are your competitors?
- Why will customers choose your product or service over the competition?
- Where is the ideal location for your business?
- Can you open the type of business you want to in that location?
- When is the ideal time to start your business?
- What price should you charge for your product or service?
What is Sole Proprietorship?
This is the easiest and least expensive method of setting up a new business. However, you have no personal liability protection, meaning that you are personally liable for the actions of your business. In terms of taxation, a sole proprietorship offers both advantages and disadvantages as compared to other forms of organization. Income from a sole proprietorship flows through to you, the owner, and is taxed as your own personal income. This keeps taxation relatively simple. On the other hand, a sole proprietorship must pay self-employment tax on top of personal income tax. Also, unlike with other forms of business such as a corporation, certain business tax deductions may be limited.
What is Partnership?
It is commonly said that a partnership is basically the same as a sole proprietorship except it has more than one owner. While essentially true, this basically understates the ramifications of choosing to share ownership. Combining your resources with a partner can make it easier to get your business off the ground, but it also complicates matters in many important ways. If you form a partnership, you become personally liable for the business decisions your partner makes. If your partner starts engaging in bad business deals and then leaves town, you will be left holding the bag. There are also other negative consequences to forming a partnership. It is very easy to get into a partnership, but if things don't work out or if a partner dies, getting out of it can be expensive and time-consuming.
Similar to a sole proprietorship, income in a partnership flows through to the individual partners and is taxed as personal income at their individual tax rates. Partners report income to the IRS by filing Schedule K-1.
Partnerships work best in situations where two people need to pool their resources to acquire an asset such as a building. For instance, two doctors could purchase a medical building together that contains two separate clinics. They would form a partnership to share ownership of the building, but each would form their practice separately.
When forming a partnership, it is strongly recommended you hire a lawyer to draft the agreement. As part of the process, sit down with your partner and try to come up with every possible scenario, both good and bad, that could affect the business. Then put it all in writing.
What is Limited Partnership?
This type of organization differs in one significant way from a normal partnership in that it allows for two types of partners. There are general partners who are considered the owners and managers. Then there are limited partners who are not involved in the day-to-day business and have only a limited liability. This form of organization is often used when there are individuals who want to invest money in a business, but do not want to run it. These people become limited partners and, unlike the general partners, they generally are not liable for more than their investment in the business.
A Limited Liability Partnership is similar to a Limited Partnership. Talk to your attorney for more information about this type of organization.
What is Limited Liability Company?
This type of organization is a more recent invention. It typically combines the liability protection of a corporation with a tax structure similar to that of a partnership. As with a corporation, there is more legal separation between you and your business than with other types of organization; this offers greater liability protection of your personal assets. As with a partnership, generally income is only taxed once, as personal income. Relative to a partnership, the disadvantage is that a limited liability company is more expensive and more difficult to set up.
Depending on where you plan on conducting business, another disadvantage of LLC's is that some states impose special taxes.
You should definitely speak with your attorney for more information about forming an LLC.
What is a Corporation?
The corporation is fundamentally different from other types of businesses. Instead of having a distinct owner, a corporation is owned by at least one shareholder and run by the shareholders and at least one director. Because the corporation itself is considered a legally separate entity from the shareholders, the shareholders generally cannot be held personally responsible for the actions of the corporation. The other big advantage is that the corporate structure generally makes it easier to raise money. However, it is much more expensive and complicated to set up and manage a corporation. The other disadvantage is that corporate profits currently are generally taxed twice: once at the corporate level and once at the personal level (there is currently legislation in Congress that could affect this—check with an accountant for latest laws). Because this type of structure has so many implications, it is strongly recommended you consult an attorney and an accountant before incorporating.
There are two types of corporations, the regular C-Corporation and the S-Corporation. Unlike a C-Corporation where earnings are currently generally taxed at both the corporate and individual levels, earnings at an S-Corporation flow through to the individual and are only taxed at the individual shareholder level. In other words, if, as the owner of the business, you are the only shareholder, all earnings your S-Corporation makes will be taxed at your personal income tax rate. You can avoid being doubly taxed. On the downside, S-Corporations are limited to a smaller number of shareholders. If you want a structure that better supports large numbers of shareholders, you are better off organizing as a C-Corporation. It is strongly recommended that you consult an attorney or tax advisor before organizing an S-Corporation.
How Do I Choose a Suitable Business Name?
Choosing the right business name may seem like a simple step, but it is important to give it serious thought. Here are some important things to consider while you are trying to come up with the perfect name.
- Identify your business' attributes: Begin the naming process by thinking about what you want your name to communicate. Consider who your customers are and what problems you solve for them.
- Be distinctive: You want a name that distinguishes you in the marketplace.
- Avoid an overly specific name if you intend to change and grow: If you plan on remaining in a narrow niche, you can be very specific with your name. But what if you decide to add new products and services? "Italian Breads" works fine until the business decides to start selling juices.
- Make your name memorable
- Make it simple to say and spell
- For easier trademarking, go with a name that is fanciful or arbitrary. The United States Patent and Trademark Office (USPTO) categorizes names—ranging from hardest to easiest to protect as trademarks—as "descriptive, suggestive, arbitrary and fanciful." Descriptive names convey a characteristic of the goods or services, such as "Clean Like New," for a Dry Cleaner. Suggestive names use a quality in the name, such as "Print Right Printers." Even more distinctive are arbitrary names like "Blue Lake Fish Farm". Fanciful names are made-up words, such as "Samsung". These names can be harder to market, but they give you more room to define your business.
- Put it to the test: If you cannot hire a marketing agency to run a focus group for you, discuss your company's naming possibilities with friends and family.
- Consider registering the name as a trademark or servicemark. It is costly, but may be worth the trouble.
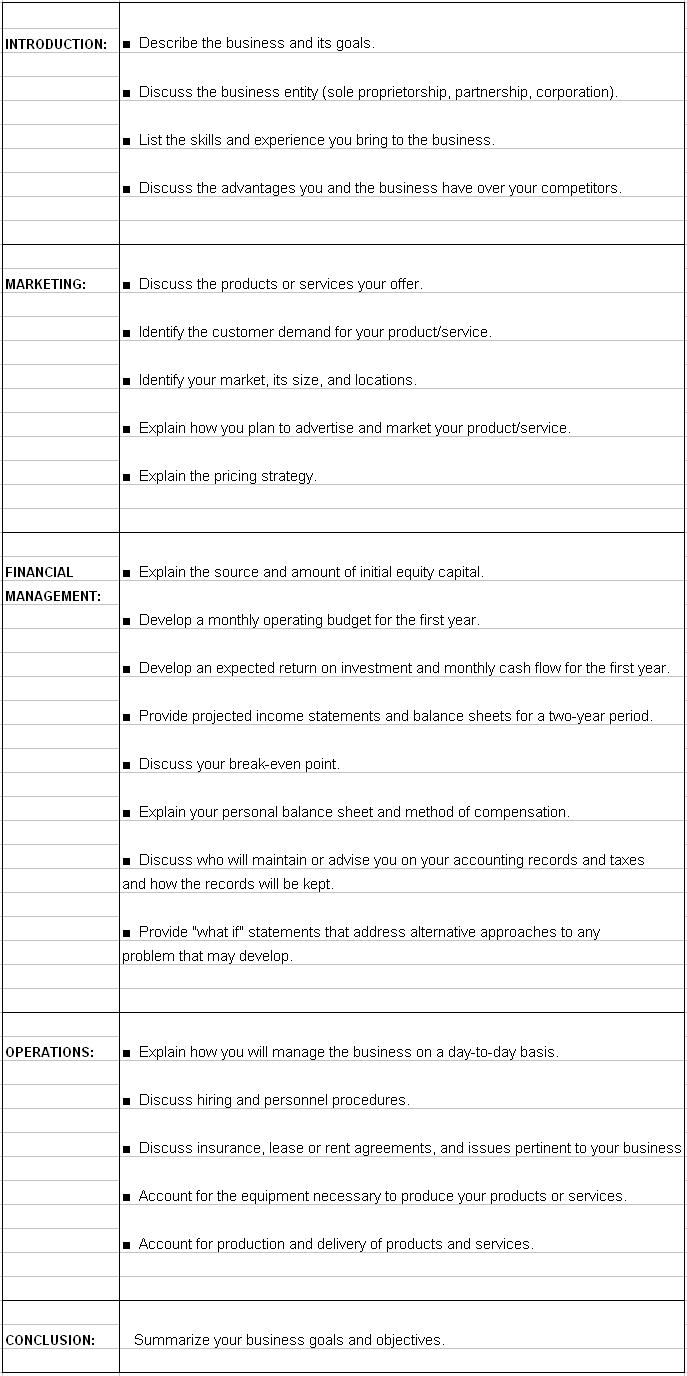
How Do I Write a Business Plan?
A business plan is like a financial blueprint for your business. It is necessary for the growth and development of your business – especially if you are looking to get a loan for your business. It is a written document defining your business’s goals, and direction. Creating a business plan will force you to think about your competition, take a hard look at your finances, and help get your business focus.
If you are using QuickBooks Premier, you will find a Business Plan Tool included that is designed to help you through the process of creating a thorough business plan in an easy-to-use, step-by-step fashion. The tool also helps you create a three-year financial projection for your business. The business plan is based on the format recommended by the U.S. Small Business Administration for loan applications or a bank line of credit.
If you do not have the QuickBooks Business Planner, you can create a plan on your own by following the business plan overview shown below.
How Do I Choose an Organization Type?
In choosing what type of organization you want your business to be, think carefully about your business and personal needs. The organization type you choose will affect your business in many ways. It is recommended that you consult a tax expert or an attorney. In choosing what type of organization you want your business to be, consider the following:
- Initial costs
- How income is taxed
- Other tax considerations such as self-employment tax and allowable deductions
- The level of liability risk you're willing to accept
- Ongoing regulations and requirements
- The importance of raising outside money
- The duration of the business' life
Depending on your needs, one type of organization will probably better suit your business than the others. If you outgrow one organization type, you can generally reorganize into a more suitable type. Here are the most common types:
Why Should I Consult with Professionals?
In starting a small business, you are almost guaranteed to come across tax and legal rules that require professional help. Which professionals you should consult depends entirely on your individual business needs. However, there are some general guidelines:
- Consider consulting a Certified Public Accountant (CPA) or an Enrolled Agent (EA) for accounting and tax planning advice. (Enrolled Agents are tax experts licensed by the federal government.)
- Get free help at your local Small Business Development Center. SBDC’s administered by the U.S. Small Business Administration exist with the sole purpose of offering management assistance to people like you—owners and prospective owners of small businesses.
- If you have questions about regulations, consult a lawyer familiar with your business field.
- Have a lawyer help you correctly form your business.
- If you plan on forming a business that owns real estate, you should consult a real estate lawyer.
- If your business is based on a unique technology, you may need to hire a patent lawyer to help you apply for the correct patents.
- If you form a Non-Profit Corporation, you will need to find a CPA who specializes in Non-Profit accounting. There are many issues specific to Non-Profits that only an expert will be able to advise you on.
-
In seeking a good professional, start by asking friends and the owners of similar local businesses for referrals. Ask them:
- Who do you use?
- Why do you use them?
- Do you like them?
- Why do you like them?
- Do they help you?
- How do they help you?
Once you get names of people to consider hiring, visit the professionals and ask them questions to determine whether they are right for your business.
How Do I Setup My Financial Systems?
By buying QuickBooks, you've started off on the right foot. Make sure you set up the program to accurately track your business. If your business is complicated, it is advisable to have a QuickBooks Professional Advisor or an accountant help you decide what should appear on your chart of accounts.
To simplify tax preparation, consider purchasing TurboTax Business. TurboTax Business is designed specifically for Corporations, S-Corporations, Partnerships (up to 100 partners), LLCs, and Estates and Trusts. The program seamlessly imports multiple QuickBooks data files so you don't have to re-enter all the information by hand.
Open a Bank Account
No matter how simple your business, it's smart to set up a separate business checking account. In fact, depending on what type of business you form, you may be required by law to establish a separate account. Unless you're a sole proprietorship that doesn't plan on hiring employees, make sure you obtain your federal tax identification number, also known as an Employer Identification Number, or EIN, before you go to the bank. You'll need the number to open the account. You can apply for an EIN by phone, online, or by mail. (The online application is not available for all types of businesses.) Applying by phone or online is recommended as the IRS has a policy of providing the number immediately.
Depending on local requirements, you may need to establish your fictitious name before opening the bank account.
You will have a very close relationship with the institution you choose, so make sure you like and trust them. Some things to consider:
- What are the various fees and charges?
- What are the minimum deposits?
- Does the bank offer small business loans?
- What kind of packages does the bank offer?
Follow Basic, Good-Sense Accounting Guidelines
- Do not mingle your money: Keep separate personal and business checking accounts. This not only protects you from troubles with the IRS, but it makes it easier for you to keep track of how your business is actually doing.
- Treat yourself like an employee: Instead of taking money out of your account on a haphazard basis, pay yourself on a regular basis. Sure, you may have to forego a paycheck every now and then, or reduce the amount you take when the account is low, but in general you will even out your accounting by following a more regimented process.
- Set aside money for income tax, sales tax, retirement, and so on: Determine your income tax rate, the amount you owe in sales tax, your retirement needs, and any other money you would like to set aside and regularly deposit that money in separate accounts. By regularly setting the money aside, you will ensure the money is there when you need it.
- Understand how your books are kept: Whether or not you actually do the accounting, as the owner of the business you should understand how your books are kept.
- Review your books regularly: By reviewing your books, you will increase the likelihood of catching unintentional errors and you will decrease the likelihood that an unscrupulous employee or accountant will attempt anything questionable with your money.
- Organize your records: Organize all of your financial information in clearly labeled binders or files and keep them in a place where they are easily accessible. Record keeping does not have to be tedious and time-consuming. By doing a little bit every day, you can keep the task manageable. In terms of what to keep and for how long, conventional wisdom says to save copies of your income and expenditure receipts for seven years. When it comes to income tax returns, keep copies indefinitely. The reason: If the IRS suspects fraud, there is no limit on the number of years it can go back for examination.
What are the federal, state, and local requirements?
Individual business requirements vary greatly by state, community, industry and the nature of the specific business, but the following list gives an overview of fairly common general business requirements.
- File a DBA with the correct authorities.
- Obtain a business license.
- Register with the Secretary of State.
- Apply for a federal tax identification number, also known as an Employer Identification Number (EIN), with the IRS.
- Comply with professional, environmental, disability and other regulations specific to your business.
- Comply with sales and use tax requirements, particularly if you plan on selling goods in a state with sales tax.
- Obtain workers' compensation insurance.
- Fill out an I-9 form for each new worker.
- Collect a W-4 form from each new employee.
- Withhold the correct amount of taxes and social security from your employees' paychecks and deposit the withholdings with the IRS.
- Comply with OSHA.
- Comply with labor regulations.
It is highly recommended that you consult with a lawyer and a tax professional about your business' individual requirements.
How Do I File My Company Papers with the Secretary of State’s Office?
File corporate or limited liability company papers with the Secretary of State's office. You should have your accountant or attorney file your paperwork with the State's office for you, since they know the ins and outs of the different organization types, and what is relevant for each. For example, if you decide to become an S-Corporation, make sure your attorney or CPA elects "S Corporation Status" by submitting the correct paperwork to the IRS, otherwise you will be taxed as a C-Corporation.
How Do I Obtain a Federal Tax Identification Number?
Unless you're a sole proprietorship and do not plan on hiring employees, you need to apply for a federal tax identification number, also known as an Employer Identification Number, or EIN. (If you've already opened a business checking account, you may already have an EIN.)
You can apply for an EIN by phone, online, or by mail. (The online application is not yet available for all types of businesses.) Applying by phone or online is recommended as the IRS has a policy of providing the number immediately.
Why Should I Register My Business Name?
If, like many small business owners, you form a sole proprietorship or a partnership and choose to give your business a name other than your own, you may have to register the fictitious name with your county, city, or state. The bureaucratic term for creating a fictitious name is "Doing Business As," or "DBA," for short. Many jurisdictions require you to publish your DBA in the local paper. Because a corporation is considered a separate entity from its owners, this regulation typically doesn't apply to a corporation doing business under its own corporate name, or to professional partnerships practicing under a partnership name. Check with your city or town hall or your local chamber of commerce for requirements. Also check with your state government.
How Do I Obtain All the Necessary Licenses and Permits to Legally and Functionally Operate My Business?
In order to determine what licenses and permits you will need to legally do business, you need to answer two questions:
- What type of business are you?
If you plan on working as an independent consultant, you generally should require few licenses and permits. In fact, if you work out of your home in certain locations, you may not even require a business license. But if you plan on running a business that sells or uses things, those things typically will determine what types of licenses and permits you will require. For instance, if you decide to open a construction company in which you will perform renovations, which usually involve some form of demolition, you will have to conform to environmental, hazardous materials, and workers’ compensation laws and regulations. Regulations also differ by industry. In order to find out which regulations you must comply with, call your local city hall, civic center, or chamber of commerce and consult your lawyer. They should be very helpful in explaining local requirements to you. Another great source of information is to research similar businesses located in the same area. If you plan on opening a restaurant in a certain neighborhood, talk to the owners of other restaurants already established there. Many occupations, such as medical doctor, require that you be licensed to practice. Contact your profession's regulatory board for assistance.
For specific state requirements, start by visiting the SBA’s list of state links (scroll down on page). If you don't find what you're looking for, check your state government's website and your state's Department of Consumer Affairs' website. The federal government also regulates some industries such as financial services, so check with the government.
- Where will you do business?
Because most laws and regulations are local, where you decide to do business is extremely important. Most cities and towns have strict zoning laws that determine what types of commerce may and may not take place in specific locations. For instance, you will find it extremely difficult to set up an auto body shop in an area zoned exclusively for residential use. Get a zoning map from your city or county planning commission. If you have any questions about zoning, call your city or town hall or your chamber of commerce.
If you work out of your home, the licenses you are required to have are often determined by your business mailing address. If you use a business mailing service as your business mailing address, the regulations that govern your business will probably be determined by the location of the business mailing service and not by your home address.
Before you sign a building lease, make sure you determine the specific regulations for your business. Also determine what changes you will need to make to the existing building. Exterior and interior architectural work is often regulated. Though the real estate agent may be helpful, he or she probably doesn't have enough specific information to give you definite answers to your questions. It is highly advisable to consult a professional such as a real estate lawyer.
How Do I Ensure I Fulfill All Employer Requirements?
If you plan on hiring employees, you will enter into a whole new world of federal, state, and local requirements.
If your business doesn't already have a federal tax identification number, you will probably have to apply for an Employer Identification Number (EIN) with the IRS. You can apply for an EIN by phone, online, or by mail. (The online application is not yet available for all types of businesses.) Applying by phone or online is recommended as the IRS has a policy of providing the number immediately.
In most states, businesses above a certain size are required to carry workers' compensation insurance in case of on-the-job accidents. Contact your state's board of workers' compensation for information and assistance. In obtaining workers' compensation insurance, shop around and compare quotes from several brokers. Also, be sure the occupational codes used to characterize your employees based on their type of work are correct. Insurance rates vary depending on what code is chosen.
Visit the Occupational Safety & Health Administration for information about federal safety requirements. Also check with your state government for additional requirements.
Visit the Department of Labor’s Employment Standards Administration Wage and Hour Division to find out about federal minimum wage, overtime, and child labor laws.
How Do I Secure My Intellectual Property?
Register trademarks
If there are any names, words, or phrases you want to protect as a trademark or servicemark, it may be a good idea to clear your use for conflicts with others' marks and to register the trademark with the federal government. You will probably need to hire a professional to do the job for you. To find out more, visit the United States Trademark Electronic Business Center.
Register copyrights
If your business will rely on any published material, consider registering the copyright in it. You may need to consult a professional. Go to the United States Copyright Office for more information.
Apply for patents
If you will be marketing an invention, you may want to apply for patents. The patent process is very complicated, so it is strongly recommended you consult a patent lawyer. For more information, visit the United States Patent Electronic Business Center.
Using your own assets to fund your business
Money, of course, cannot buy happiness but it will surely make life easier - especially when trying to start a business.
Finding outside money for a new business isn't easy. Banks are notoriously reluctant to lend money for startups. Typically, you'll need to show at least two years of profitability to win a conventional bank business loan. To get their businesses going, most small business owners start out by relying on their own assets. Here are some options to consider:
- Use your savings.
- Take a loan against the equity you've built up in your home. You have two options. You can either get a home equity loan or a home equity line of credit. But one grave drawback: if you default on payments, you could lose your home.
- Sell some investments.
- Sell some assets.
- Borrow against your 401(k).
- Apply for a grant.
- Get credit card advances. (Note: Use this option carefully. The money is easy to get, but it comes with a hefty price tag of high interest rates.)
Borrowing from friends and family
If you can't fund the business on your own, friends and family are a great option. Unlike a bank, they know your character well and will probably be more willing to take a risk on your business idea. However, because of the risk that mixing business and friendship may sour the relationship, you'll want to proceed carefully. Here are some guidelines to follow:
- Have your attorney draw up a formal agreement with collateral specified and all the terms spelled out, including the interest rate, payment schedule, and what recourse the lender has if the loan is not paid.
- When you pitch your business idea to your friend or family member, approach the meeting professionally. Present your idea and your business plan just as if you were applying for a loan at a bank.
- Avoid mixing emotions with business. If a family member offers to loan you money in exchange for having a closer relationship, accepting the offer could create a very bad situation.
Borrowing from a bank
Banks have the money, but the chances of a new business qualifying for a loan are very small. Unlike your family, a bank won't lend you money simply because they like your idea and trust your character. Still, some new businesses do qualify for loans. Whether or not you can qualify depends heavily on your business' cash flow, your personal credit history, your equity in the company, and the collateral used to secure the loan.
The Small Business Administration (SBA) offers several programs to help businesses get loans. The SBA's greatest aid comes in the form of a loan guarantee to the bank. If you are unable to repay the loan, the SBA will repay the bank a pre-determined percentage of your loan.
Checking with minority or women’s organization
If you're a woman or a minority, there are many organizations that have been set up to help both groups get their businesses off the ground. Some organizations may offer special financing deals.
Applying for a grant
Many foundations and government agencies offer grants or incentives to small businesses that meet specific requirements. Some grants are offered as part of an entrepreneurial award. Check your local government for more information.
Finding other sources of investments or funding for your business
There are a few other sources of equity funding worth mentioning. But remember, when you open your company to outside investment, you also open it to some degree of outside control. The more money you get from the outside, the less control you'll retain.
Venture capital
Getting capital from a venture capitalist is extremely difficult, but it is possible. Venture capital firms generally look for entrepreneurs with unique ideas that can't easily be replicated. They're interested in businesses that are relatively cheap to start and that can quickly grow to be multi-million dollar corporations that offer public stock.
Angel investors
Angel investors are private individuals who invest money in businesses. Like venture capitalists, they're hoping to get a large return on their investment. Unlike venture capitalists, they may be willing to offer you money without imposing so many conditions.
Fulfilling all tax requirements
When, what, and how often you file your taxes will depend on your individual business and on the type of organization you decide to become. A sole proprietor running a part-time consulting business out of his home may only have to file quarterly estimated taxes, whereas a corporation selling products in several states will have much more complex requirements.
Overall, there generally are three broad types of taxes that many small businesses face: taxes on business profits, taxes on payroll, and sales and use taxes.
It is highly recommended that you consult with a tax professional about your business' individual tax requirements.
Keep detailed record of all deductible expenditures
When it comes time to file your taxes, the IRS will only grant you the expenditures you can document. If you use your car in the course of doing business, track your mileage using a log book, or better yet you can track your vehicle mileage in QuickBooks. Consult a tax expert to find out the deductions for which your business qualifies.
Obtain business insurance
Your insurance needs will depend completely on the size and nature of your business. If you're a small sole proprietorship, you may only need health insurance for you and your spouse. But if you start a corporation with employees, machinery, and inventory, you'll need to consider much more coverage. Consult a professional to determine what your needs are.
One rule of thumb when deciding on a policy: shop around. When it comes to small businesses, different insurers can charge very different premiums within the same industry. It all depends on how many claims that individual insurance company has had to pay to companies within the industry.
Here are some types of insurance to consider.
- Liability
- Vehicle
- Property
- Theft
- Business interruption
- Inventory
- Employee health and life
- Workers' compensation
How Do I Setup an Administrator in QuickBooks?
Step 1. Decide who the administrator will be. Choose someone who is usually available in your office.
Step 2. Go to the “Company” menu, click “Set up Users and Passwords”, and then click “Set up Users”.
Step 3. In the “User List” window, select “Admin” and click “Edit User”.
Step 4. Enter the name of the person who will be the administrator.
Enter a password in the “Administrator's Password” field. Enter the password again in the “Confirm Password” field.
Step 5. Click the “Challenge Question” drop-down arrow, select a question, and then enter an answer in the “Challenge Answer” field.
Step 6. Click “Next” then click “Finish”.
What do these choices mean in access selection?
Selected areas of QuickBooks: Lets you choose which areas (sales, purchases, payroll, and so on) the user can access in QuickBooks. A sequence of questions helps you select the areas.
All areas of QuickBooks: Gives the user access to all areas. The user can do everything except a few special activities reserved exclusively for the QuickBooks Administrator. Activities the user won't be able to do are:
- Setting up passwords and permissions
- Importing and exporting data
- Changing company setup information
- Changing company-specific preferences
Setting Up Users & Passwords: How to Add Users and Limit Their Access
Step 1. Go to the Company menu, click Set Up Users and Passwords, and then click Set Up Users.
Step 2. Click Add User.
Step 3. Assign a user name and password:
- Enter the name of the person in the User Name field.
- Enter a password in the Password field and again in the Confirm Password field.
- Click Next.
Step 4. Choose whether this person will have access to selected areas of QuickBooks or all areas of QuickBooks. What do these choices mean?
Step 5. Click Next.
If you granted access to all areas of QuickBooks, you have no more selections to make. Click Yes to confirm that you want this person to have full access. Click Finish to complete the setup process.
If you are selecting the areas the user has access to, make your selections in the window. Click Next to go to the next window.
Step 6. When the “Changing or Deleting Transactions” window opens, click Yes to the first question if you want the user to be able to edit and delete transactions in addition to creating them, and then indicate whether you want the user to have access to transactions from prior accounting periods.
Step 7. In the last window, review the table that summarizes the access rights you granted. If you need to make a change, click Prev to return to the appropriate window.
Step 8. Click Finish to complete the setup process.
Changing Users and Passwords in QuickBooks
Step 1. Go to the Company menu, click Set Up Users and Passwords, and then click Set Up Users.
Step 2. Select the user you would like to change from the list, and then click Edit User.
Step 3. Replace the username and password with the new user's name and password:
- Enter the name of the person in the "User Name" field.
- Enter a password in the "Password" field and again in the "Confirm Password" field.
- Click Next.
Step 4. Choose whether this person will have access to selected areas of QuickBooks or all areas of QuickBooks. What do these choices mean?
Step 5. Click Next.
If you granted access to all areas of QuickBooks, you have no more selections to make. Click Yes to confirm that you want this person to have full access. Click Finish to complete the setup process.
If you are selecting the areas the user has access to, make your selections in the window. Click Next to go to the next window.
Step 6. When the "Changing or Deleting Transactions” window opens, click Yes to the first question if you want the user to be able to edit and delete transactions in addition to creating them, and then indicate whether you want the user to have access to transactions from prior accounting periods.
Step 7. In the last window, review the table that summarizes the access rights you granted. If you need to make a change, click Prev to return to the appropriate window.
Step 8. Click Finish to complete the setup process.
Closing an Accounting Period: How to Set a Closing Date and Password
To close your book, you need to set a closing date. You can also limit access to the closed accounting period by setting a closing date password.
If you decide to set a password, QuickBooks requires the password for changes that would alter balances for the accounting period you have closed. This includes adding, editing, or deleting transactions dated on or before the closing date. You can change the password at any time.
To Set the Closing Date and Password:
Step 1. Open the accounting preferences, by going to the “Edit” menu and selecting “Preferences”. Then clicking on “Accounting” in the list on the left.
Step 2. Click the "Company Preferences" tab.
Step 3. In the Closing Date section, click the "Set Date/Password" button.
Step 4. In the Date section, select the date through which you want your books to be closed.
Step 5. Enter a password in both the "Password" and "Confirm Password" fields to limit access to the closed accounting period.
Step 6. Click "OK".
Closing Your Books – Pros and Cons
You can choose whether or not to close your books at the end of a period or year. QuickBooks does not require you to do so.
Advantages to closing your books
- Restricted access: You can set a password to restrict access to data from the prior accounting period, including the details of every transaction. Transactions cannot be changed without your knowledge. To modify or delete a transaction in a closed period, a user must know the closing date password and have the appropriate permissions.
- Data Security from any Change: Any mistaken changes that might have been made, cannot be made as QuickBooks will warn you about the changes you are about to make in a closed period - even if you did not set a password. If you did set a password, which I highly recommend, then no changes could be made without entering the password to grant access.
Advantages to NOT closing your books
- Detail: You always have easy access to last year's data, including the details of every transaction.
- Reporting: You can create comparative reports between this year and last year.
Year-end adjustments QuickBooks makes automatically
QuickBooks performs certain year-end adjustments based on your fiscal year start month.
- QuickBooks adjusts your income and expense accounts at year-end to zero them out. Therefore, you start your new fiscal year with a zero net income.
- QuickBooks makes an adjusting entry to your net income. For example, if your profit for the year was $58,000, on the last day of your fiscal year the equity section of your Balance Sheet would show a line for net income of $58,000.
- On the first day of the new fiscal year, QuickBooks increases your Retained Earnings equity account by the previous year's net income ($58,000 in this example) and decreases your net income by the same amount. This way, you start each new fiscal year with a net income of zero.
How to Merge Two Companies in QuickBooks
QuickBooks does not currently provide for the merging of two companies. Only lists, such as customer and vendor, can be imported and exported presently - not transactions. If it is absolutely imperative that you combine your company files, there are a few specialized third-party software available that can be used to get this done. One such software is the Data Transfer Utility created by Karl Irvin.
It is important to note that if you are currently using the payroll in any of your files, you will not be able to merge your payroll data with your third party application. One option is to use two files: the first to enter and process all payroll transactions, and the second file will be the file that houses all company transactions. After you have processed your payroll and paid the liabilities from the payroll file, you will need to enter an adjusting journal entry into the second file to reflect the changes to the liability accounts as necessary.
How to Import Specific Data from One Company to Another in QuickBooks
In order to import data into a company file, the data must first be exported. To utilize the import feature:
Step 1. Log in to your data file as the Administrator.
Step 2. If you are in multi-user mode (MU), switch to single user (SU) mode.
Step 3. In the "menu bar", select File and then Utilities.
Step 4. On the "sub-menu", select Import, and then IIF Files.
Step 5. In the "Import Window", click Desktop in the sidebar, select a file to import and click Open. A message should appear that the data has been imported.
Step 6. Click OK.
How to Export Specific Data from One Company to Another in QuickBooks
To utilize the export feature:
Step 1. Log in to your data file as the Administrator.
Step 2. If you are in multi-user mode (MU), switch to single user (SU) mode.
Step 3. In the "menu bar", select File and then Utilities.
Step 4. On the "sub-menu", select Export, and then Lists to IIF Files.
Step 5. Put a "checkmark" next to each of the lists you want to export.
Step 6. Click OK.
Step 7. In the Save In window, browse to the location where you want to save the IIF file (often, this will be your desktop).
Step 8. In the "File name" field:
- Delete the asterisk (*). Windows will not save a file if you do not delete the asterisk (*).
- Enter a file name with the extension of .IIF.
Step 9. Click the Save button.
Step 10. Click OK to the message that the file was successfully saved.
Step 11. Repeat Steps 3 - 10 until all needed lists are exported.
Step 12. "Right click" on an exported file on your desktop and select Open With.
Step 13. Select Microsoft Office Excel.
Step 14. If you get the wizard to "convert a text file", click Next, then Next, and Finish.
How to Navigate to Each Company in QuickBooks
Step 1. In the "menu bar", select File and then Open previous company. You should see a list of your companies, with the one you are currently in, on top.
Step 2. Select the company you wish to open, and wait a few seconds for QuickBooks to open it.
Step 3. If it takes you to a window stating "No Company Open" you will see a list of your companies. Select the company you wish to open from the list, and click Open. If you get a message stating "QuickBooks Need Updating" select Yes and wait a few seconds for QuickBooks to update. It will open after it has finished updating.
What is Syncing and Why Sync My Data
Syncing is linking your hard drive QuickBooks data to QuickBooks Servers. This allows you to be able to access your data from any computer with an internet connection.
Ho Does This Work?
QuickBooks saves your company files to their servers "in the cloud" - meaning online, then QuickBooks web and mobile apps enable you to access your Company's files from anywhere. As you work in your company files, QuickBooks automatically uploads your changes to their server. For example, the invoices you create in QuickBooks on your computer running QuickBooks, will be uploaded to QuickBooks servers in the "cloud" and be accessible from any device with an internet connection.
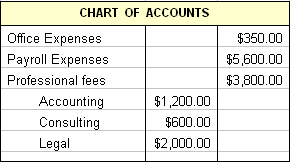
What is a Sub-Account?
A sub account is an account that is under or a part of a parent account. Sub Accounts enable you to create a hierarchy of accounts so that you can group information about similar accounts in reports and graphs. See example of sub-accounts in the Chart of Accounts diagram below; Accounting, Consulting, and Legal are sub-accounts of Professional fees:
How to create a Sub-Account:
Step 1 Go to Company then click Chart of Accounts.
Step 2. Click Account, then New.
Step 3. Select the type of account you are creating - Expense, Income, etc, and click Continue.
Step 4. Enter the account name you are creating in the "Account Name" field, and check the box at "Subaccount of". Click the drop-down icon to see the list already in your chart of accounts and select the account you want to make this new account a sub of.
Step 5. Click Save and Close. You should see it in your Chart of Accounts below the parent account, and slightly indented.
What is a Sub-Item?
Subitems enable you to create a hierarchy of items so that you can group information about similar items in reports and graphs.
How to create Sub-Item:
Step 1. Go to the List menu and select Item List
Step 2. Click Item and select New
Step 3. In the New Item window, create the "parent" item (that is, the item that will have subitems) first. (If you will not be using the parent item on invoices and sales forms, you can leave the rate or price of the parent item at zero. However, you must assign an account to the item. QuickBooks requires an account even if you do not plan to sell the item.)
Step 4. Click Ok.
Step 5. Now to make the sub-item, repeat the first two steps to get back to the "New Item" window. Create the name you want by adding it in the "New Item" box, then select the Subitem of checkbox and choose the name of the parent item you want this to be a sub of.
Step 6. Click Ok.
Items: How to Add Items for the Services You Provide in QuickBooks
Step 1. Go to the List menu and select Item List
Step 2. Click Item and select New
Step 3. In the "New Item" window, select the "Type" of account you want to create - services, non-inventory, etc. from the drop-down list. Enter the name of the item you want to create, and if you will be using this item with a fixed description and rate, you may enter a description and rate. You must assign an account to the item. (QuickBooks requires an account even if you do not plan to sell the item.)
Step 4. Click Ok.
How to Delete Unused List Items or Make Them Inactive
You can delete an unused item, and remove it permanently from the list but it cannot be undone. You can also make an item inactive, which removes it from the normal list view but retains the record so that you can access it again. Inactive items will not be exchanged with Point of Sale.
- Go to the Lists menu and click the list with the item to delete.
- Click the item to delete or to make inactive.
- Select Account then Delete Account to delete, or Make Inactive to make it inactive and not appear in reports.
- Answer Ok to question "Are you sure you want to delete this account?"
Assign a Unit of Measure
In order to assign a unit of measure, you must first turn on inventory tracking. (When you are finished turning on your inventory tracking, click the back arrow in your browser to get back here.
Now, in the "Unit of Measure" section, click the drop-down arrow and then do one of the following to assign a unit of measure:
1) Click an existing unit of measure (Single U/M Per Item mode) or an existing (Multiple U/M Per Item mode).
2) Click the "Enable" button (if you see one) and complete the wizard to assign a new unit of measure.
Integrated Applications Preference Settings
Step 1. Go to the Edit menu and click Preferences.
Step 2.Click Integrated Applications on the left side of the window.
Step 3.Click the Company Preferences tab.
Step 4.Make sure that the box next to Don't allow any application to access this company file is not selected.
Step 5.Click OK.
QuickBooks Pro vs QuickBooks Premier: Difference Between QuickBooks Pro and QuickBooks Premier Editions
QuickBooks Pro and QuickBooks Premier operate using almost all of the same features. There are two (2) main differences between QuickBooks Pro and QuickBooks Premier:
1) QuickBooks Pro allows up to three (3) users to work simultaneously in QuickBooks, while QuickBooks Premier allows up to five (5) users.
2) QuickBooks Premier has an extensive Inventory Center that allows you to be flexible with your inventory controls, QuickBooks Pro is very limited when working with inventory.
Preparing QuickBooks to Work with QuickBooks Point of Sale
Before you can integrate QuickBooks Point of Sale with your QuickBooks, you must have both programs installed, and subsequently set up your QuickBooks company file to support the exchange of information.
Step 1. Turn on the inventory tracking features in QuickBooks so that it can be integrated with Point of Sale.
- Go to the Edit menu and click Preferences
- In the list at the left of the Preferences window, click Items & Inventory
- In the list at the left of the Preferences window, click Items & Stock
- Click the Company Preferences tab
- On the Company Preferences tab, select the Inventory and purchase orders are active checkbox
- Click OK
Step 2. Setup the Inventory Accounts you need by adding the following to your Chart of Accounts:
- Inventory Asset (account type = Other Current Asset): This account tracks the current value of your inventory. (QuickBooks usually create it automatically when you set up your first inventory item, so check to see if it is already there.)
- Sales Income (account type = Income): This account tracks the income from the resale of inventory items. QuickBooks may have already created this account for you based on the information that you entered in the EasyStep interview. Check to see if it already exist, by going to the List or Company menu and selecting Chart of Accounts
- Cost of Goods Sold (account type = Cost of Goods Sold): This account tracks the cost to you of the items you have sold. On a profit and loss report, QuickBooks subtracts the total cost of goods sold from your total income to provide a gross profit before expenses. QuickBooks creates it automatically when you set up your first inventory item, so check to see if it is in your Chart of Accounts.
Step 3. Create an inventory part item using the same inventory part items for sales and purchases on both your sales forms as well as your purchase orders. This is necessary to keep your inventory accurate.
- Go to the Home menu
- In the Company section, click Items & Services
- Click Item at the bottom of the list and click New
- Click the Type drop-down list and click Inventory Part. (If Inventory Part is not in the list, it means you have not turned on your inventory tracking. Turn on inventory tracking now. (Step 1. only) When you are finished, click the back arrow in your browser to get back here.
- Enter an Item Name or Number. (What you enter here is displayed in the drop-down list of items when you are filling out a sales form or purchase order. Enter a name or number that will help you distinguish this item from all the others on the list.) Also, if this Item is a Sub-item of an existing item, select the Subitem of checkbox and choose the parent item from the list.
- Enter the manufacturer's part number. This is optional, but it you know it enter it, it may save you time locating it later - should you need to.
- Assign a "Unit of Measure". This is also optional, so if you will not require this function, you can bypass it.
- Now you need to fill in the Purchase Information fields:
- Enter a brief description of the item in the "Description on Purchase Transactions" field. The description entered here will be the item description your vendors see. It is optional to enter it now, you can enter a description each time you are creating purchase orders, invoices, etc.
- In the Cost field, enter either the last amount you paid for this item or the amount you expect to pay next time you purchase it. (This is optional). Also, if you have set a default markup percentage, you will need to enter a cost if you would like QuickBooks to automatically calculate the sales price.
- The Cost of Goods Sold account is pre-selected in the COGS Account field. You can choose a different account if you want to.
- Click the Preferred Vendor drop-down list and choose the vendor you usually buy this item from. The preferred vendor will appear on the Stock Status by Item report and on the Physical Inventory Worksheet.
- Fill in the Sales Information fields.
- Fill in the Inventory Information fields.
- Click Inventory Site Info to set site specific reorder points. You can track multiple inventory sites with the Advanced Inventory add-on which is only available in QuickBooks Enterprise Solutions. (This is optional, and there is a fee associated with it).
- Click Custom Fields to fill in or define custom fields for this item. (This is optional).
- Click OK to record the item, or click Next to record the item and start creating another.
Step 4. Make sure that your QuickBooks Integrated applications company preference is set to enable communication with Point of Sale. The default QuickBooks setting is to allow access, so this setting should only have to be changed if you have previously changed it to not allow access. Check your Integrated Applications Preference Settings.
Step 5. Check to ensure you have setup all the QuickBooks Accounts to which Point of Sale transfers data. Go to the "Lists" menu and click Chart of Accounts to review your QuickBooks Chart of Accounts; make sure you have the following accounts:
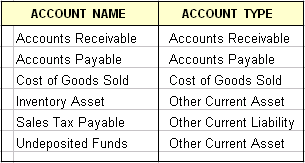
Step 6 Turn on sales tax if you collect sales tax on sales. This should already be turned on during your initial "Easy Step Interview" setup.
Step 7. Review and update your QuickBooks Lists as necessary. If you've been using QuickBooks for some time, you may have some customers, vendors, or items who are no longer needed or used. Cleaning out unused items helps streamline Financial Exchange and avoids duplication of unused items. See How to Delete Unused List Items or Make Them Inactive.
How to Connect QuickBooks with QuickBooks Point of Sale
The QuickBooks Connection Wizard is used from within Point of Sale to connect the programs. The connection wizard is automatically launched when a connection is necessary to complete a financial exchange task. You can also launch the wizard manually at any time from the following areas in Point of Sale:
- The Use with QuickBooks page of the Setup Interview
- The Financial page of company preferences
- The Financial Center
Follow the steps below to manually make the connection:
Step 1. Start QuickBooks and open your financial company file. You must Log in as a user with Admin rights in order to do this.
Step 2. Switch to "Point of Sale" and launch the connection wizard from any of the following areas described above.
Step 3. Follow the wizard's on-screen prompts until the connection is completed.
Step 4. Close the connection wizard when done.
Once the connection has been established, Point of Sale reconnects to the same QuickBooks company file on subsequent exchanges. It is not necessary to run the connection wizard again unless there's been a change in your configuration, such as when moving, renaming, or creating a new QuickBooks company file. The wizard notifies you that it cannot locate the prior file in these cases and prompts you to enter the new file or location to which you want to connect.
You can also enable automatic Log in when QuickBooks is not running. Enabling automatic Log in should have already been done while you were running the connection wizard. If you did not have this option from the connection wizard, you can use the following procedure to manually allow automatic Log in:
Step 1 Open your QuickBooks Financial Software company file in "single-user mode" and sign in as the Administrator.
Step 2. From the Edit menu, select Preferences and then select Integrated Applications.
Step 3. Select the Company Preferences tab and highlight QuickBooks Point of Sale in the list of applications.
Step 4. Select Properties.
Step 5. Select the Allow this application to login automatically check box.
Step 6. Select the user ("Admin" is recommended) and then select Ok.
How to Import QuickBooks Data into QuickBooks Point of Sale
If you already have a QuickBooks company file with existing customers, vendors, and inventory when you start to use Point of Sale, you can import that data into Point of Sale. Importing your existing QuickBooks data greatly reduces the data entry time in Point of Sale and gets you up and running more quickly.
Customer and vendor records in QuickBooks that are not marked inactive are automatically imported to Point of Sale when you run your first financial exchange. (The import of QuickBooks inventory items is optional. Until you import your QuickBooks items, or specify that you do not want to, Point of Sale reminds you each time you open your Point of Sale item list.)
How to Initiate Financial Exchange
Financial Exchange is the exchanging of financial information between your QuickBooks software and Point of Sale.
Financial Exchanges can only be done from the Server Workstation. There are two ways to initiate a Financial Exchange between Point of Sale and QuickBooks:
1) Setup automatic exchange:
Step 1. On the Point of Sale Server Workstation, choose Point of Sale, then End of Day Procedure
Step 2. On the "End of Day" window, ensure that the Exchange data with QuickBooks check-box is selected. (You may choose other End of Day options you desire.)
Step 3. Click OK.
2) Manual Exchange:
You might manually run an exchange, for example, if you want to do mid-day billings from QuickBooks and want to be sure that you have up-to-the-minute Point of Sale sales data.
From the Financial menu or the Financial Center, select Update QuickBooks.
When the exchange is completed, a summary window displays the number of records exchanged and whether any errors occurred. Select View Activity Log from this window for help in locating any errors that are listed.
Also, your QuickBooks financial software company file must be open or you must have your financial software preferences set to allow automatic access during exchanges, before doing the exchange.
And, if you use remote data sharing, you must have your QuickBooks company file open and the server application running during all financial exchanges.
The quantity of items imported into Point of Sale is zeroed-out in QuickBooks and a corresponding general journal entry made to adjust the Inventory Asset account. To balance against these entries, adjustment memos are created in Point of Sale and sent to QuickBooks with the next financial exchange so that your inventory value is unchanged. From this point on, quantities of the imported items are tracked in Point of Sale, and transactional documents created in Point of Sale will update your inventory value accordingly as they are sent to QuickBooks.
Data that is Shared Between QuickBooks and QuickBooks Point of Sale
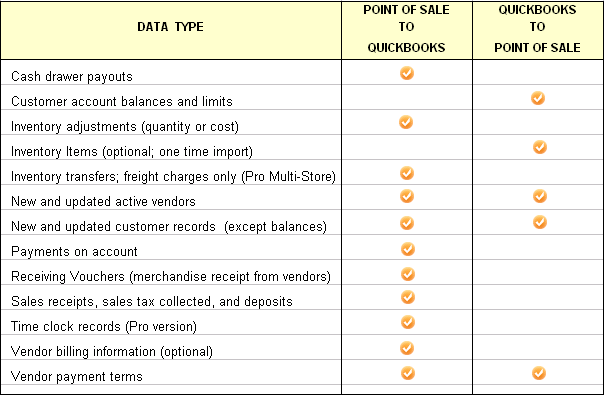
Employee records, tips, and commissions are not shared in either direction. Inventory items or quantities are shared only in the initial import from QuickBooks to Point of Sale.
Only new data or data updated since the last exchange is sent when Financial Exchange is run. In addition, each time a financial exchange occurs, your QuickBooks company file Chart of Accounts, sales tax (items, codes, groups), and payment types are read and made available within Point of Sale for selection when mapping (linking) these items between the programs.
Also, if you have existing purchase orders in QuickBooks when integrating, you can manually re-enter them in Point of Sale. Doing so allows coordinated tracking of purchases, better reporting capabilities, and the ability to create receiving vouchers from these purchase orders when the merchandise arrives.
How to Setup Online Banking in QuickBooks (2010 or later) Using Direct Connect
Step 1. Go to Banking, select Online Banking, then Set Up Account for Online Services.
Step 2. Click the "Select your QuickBooks account" drop-down arrow, and select the QuickBooks account that will connect to your Financial Institution, then click Next.
Step 3. Click the "Enter the name of your Financial Institution" drop-down arrow and select the Financial Institution for this account, and then click Next.
Step 4. Select the Direct Connect option (if displayed) and click Next.
Step 5. Select Yes, my account has been activated for QuickBooks online services and click Next.
Step 6. Enter the Customer ID, Password, and Confirm Password to sign in to your Financial Institution.
Step 7. Click Sign In. QuickBooks will connect to the bank's server to download bank data for the selected account.
Step 8. Select the account you want to connect to QuickBooks.
Step 9. Click Finish after the download completes. You have successfully activated online banking.
To ensure your online banking is functioning correctly, select the following option that fits your online banking preference:
- For side-by-side mode: Select the account you want to download from the Financial Institution section labeled "Download Online Accounts" and click Receive Transactions.
- For register mode: Select "Download Bank Data for account: XXXX (your bank account number)" from the "Items To Send" section and click Go Online.
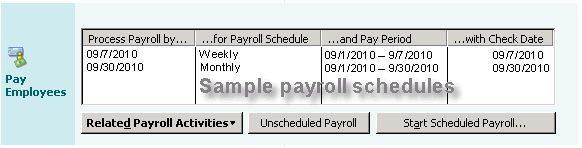
Payroll Schedule: What is Payroll Schedule?
A payroll schedule defines when you should run your payroll so that you can pay your employees on their pay day. You define how often you pay your employees (weekly, biweekly, monthly, and so on), which date their paycheck is due, and which day you run payroll, and QuickBooks calculates your upcoming payroll schedule and reminds you so that you can pay your employees on time.
Payroll schedules allow you to group employees who have the same pay frequency in whichever way that makes the most sense for you to effectively run your payroll and your business. However, all employees grouped in the same payroll schedule must have the same same pay frequency (for example, weekly, bi-weekly, semi-monthly, and so on). In other words, you can set up multiple payroll schedules for the same pay frequency. For example, even if you are paying all your employees weekly, you could set up separate payroll schedules to group together:
- Hourly employees and salaried employees.
- Employment by location, department, job, or class.
- Employees who are paid via Direct Deposit and those who are paid by regular check.
QuickBooks allows you to setup a maximum of 200 payroll schedules.
After you have set up your payroll schedules, they will appear in the Pay Employees section in the Payroll Center. Below is an example of what your payroll schedules will look like after you have set them up:
To assign an employee to a pay schedule:
Step 1. Go to Employee, then Employee Center and select the employee you want to add to a schedule for by double clicking the employee.
Step 2. Next, click on the Payroll Info or Payroll and Compensation Info tab, and choose the payroll schedule for the employee.
Step 3. Click Ok.
How to Add a Customer Job in QuickBooks Windows (Pro, Premier, Enterprise)
Step 1. Go to Customer, and click Customer Center.
Step 2. Right click on the customer you would like to add a job for, and select Add Job.
Step 3. In the Job Name field, enter the name you use to identify this job (for example the job address). All the other fields should already be filled in when you created this customer.
Step 4. Click Ok. You should see the job at bottom slight right of the customer you just added the job for in the customer list. You can repeat this to add as many jobs to this customer or other customers as you require.
How to Setup a Bank Account in QuickBooks
Step 1. Go to List in the menu bar, and select Chart of Accounts.
Step 2. Click on Account at bottom-left of new window, and select New.
Step 3. In the "Add New Account" window, click on Bank, then click Continue.
Step 4. In new window, fill in the Account Name field with your Bank's name. (You can add the ending numbers of your account number to the Bank's name to differentiate if you have many accounts with the same bank or add "Checking, Savings, MM etc). In the Bank Acct. No field, enter your bank account number. In the Routing Number field, enter your bank's routing number. You can leave the Tax-Line Mapping field as is (B/S-Assets: Cash).
Step 5. Click on Enter Opening Balance and enter the ending balance on your last statement prior to your QuickBooks Company start date. (For example, if you started your company in QuickBooks on January 1, 2010, you would enter your December 2009 statement's ending balance here along with your statement's ending date.) If you are adding a new Bank Account to your existing QuickBooks Company that you have been previously using with other bank Account(s), enter the amount you used to open this new Bank Account.
Step 6. Click Ok then Save & New to enter another account, or Save & Close, if you are finish.
How to Reconcile a Bank Account in QuickBooks
Step 1. Go to Banking in the menu bar, and select Reconcile.
Step 2. In the "Begin Reconciliation" window, click the drop-down button at "Account" and select the account you want to reconcile. Enter your bank statement's ending date in the "Date" field.
Step 3. In the "Ending Balance" field, enter the ending balance on your bank statement. (Your "Beginning Balance" should match the beginning balance on your bank statement.) if it does not match, see How to correct my opening bank balance.
How do I print a listing of unreconciled transactions in QuickBooks?
Step 1. Go to List in the menu bar, and select Chart of Accounts.
Step 2. Click on the bank account you are seeking the report for, and hit Ctrl Q for a QuickReport.
Step 3. Select "All Dates" for the date range and use the "Filter" option to filter the report for Cleared=No.
Step 4. Click Apply.
.png)